
How is a screen painted in Flutter?
Flutter Demystified


It has been set in stone since the day flutter came into being -
Everything in Flutter is a widget.
But widgets are just the first layer in a series of layers that the flutter framework needs to handle before the actual pixels are rendered to the desired effect.
This article deep dives into these layers and the interactions between them. More specifically we will try to focus on the things that effects us as developers.

While most of the time we do not directly interact with the low level layers, it is important to have an understanding of the rendering process while debugging layout issues.
Let’s begin by getting familiar with various layers of the flutter framework.
Layers of the Flutter Framework
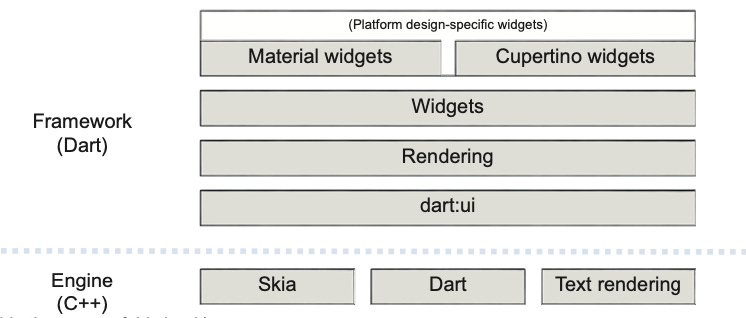
The top 2 layers in the framework are exposed to the developers where we use the widgets to manage and code the entire application. At its lowest level, the dart:ui layer is responsible for talking directly with the rendering engine of the device. This layer exposes the APIs needed to directly paint on the screen and handle every user interaction.
In the middle of these two sits the rendering layer. This is the layer that consumes the APIs provided by the dart:ui layer and renders the UI. Without this we would have to manually manage every single pixel on the screen.
Interactions between the layers
After having understood the functions of each of the framework’s layers, we will address how these layers interact with each other.
These interactions can be represented with the following figure

Once flutter starts executing the code , it calls the runApp() method from the main() method, which creates the root of the widget tree. Flutter framework then goes through all the widgets and builds a widget tree. For each widget the framework also creates a corresponding element by calling the Widget.createElement(this) method. Once all the elements are mounted , they together form an element tree.
At this stage widgets can be understood as the initial configuration of a UI element and the associated elements just have references to these widgets.While the element tree holds the structure of the application, the corresponding widgets hold all the configuration details.
The element tree doesn’t have to rebuild itself frequently. When a widget is rebuilt or replaced in the widget tree, the element just updates its reference to the now newly built or replaced widget. Since widgets are handled by a dedicated element, they become cheap to rebuild or replace in the tree without disturbing the others. This gives major performance benefits to the framework. For example, consider an animated widget updating its shape or colour at 90 fps. The associated element will not have to rebuild itself because the tree structurally will still be the same.
Each element also has a RenderObject and in order to create a RenderObject Flutter calls the method Widget.createRenderObject(context) for each widget in the tree.
All of these render objects make up the render tree. Render objects are the interface between our high-level code and the low-level dart:ui library. With that in mind, you can think of the element as the glue between the widget and render trees
Render objects do the actual painting to the screen and are therefore quite complex and expensive.That’s why there are three trees in Flutter. They give the framework the ability to internally be smart about reusing expensive render objects while being careless about destroying inexpensive widgets.
The render objects carry out the crucial job of painting to the screen in the apps but by themselves render objects don’t have any state. They have some data about their parent render objects and can visit their children, however their scope is not spread across the whole app.
Conclusions
There are several other objects apart from widgets that play a significant role in the flutter framework. Together these objects are internally created by the framework to handle the task of painting the app screen as configured using widgets.
Keep watching this space to learn more about Flutter and how to create awesome applications with it.
In the next article we will talk about how to work with RenderObjects.
This was very helpful.